


The Square Marquee, Lasso and Wand tools are highlighted here.
Channels are essentially selections, the same as your Marquee tool (Shortcut "M" in your toolbox) or your Lasso tool (Shortcut "L" in your toolbox). When you draw a box, ellipse, or irregular shape with your Lasso or Wand, you're telling Photoshop you want it to pay attention to part of the active image area and ignore others. When you bring layers into this, it can get very complicated and potentially tough to understand, because you can have a selection go over several layers, but you can usually only draw an manipulate in one layer at a time.
Those selections are essentially a collection of Pixels, and a channel is a Grayscale representation of those pixels. (Grayscale is a limited color mode that only looks at 256 shades of gray, denoting value but no Hue or Saturation.)
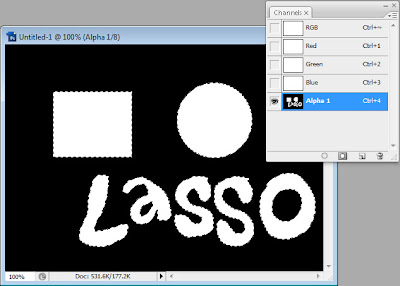
Channels are effectively painted representations of these selections. In the above demo image, I've taken my selections I created and painted them in as white in a new "Alpha Channel" in my channels palette. The white areas here represent the selected area, while the black ones represent the non-selected area.
This is built on a model of "Light-based" color spaces. RGB, you may recall, is based on combinations of Red, Green, and Blue lights to create pure white light. You don't really need to have a deep grasp of that to understand that the standard setting for Selections in Channels means that White is your selection, while Black represents emptiness. Like outer space, where there isn't white, there is black--no reflection of color.
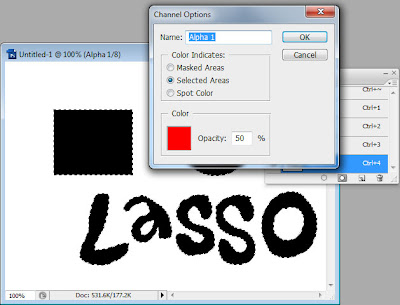
I personally can't stand working with Channels this way. I'm too hard wired to think of Black in terms of pigment, so I always switch my Channel's Default Setting to "Color Indicates Selected Areas." This sets your channels to react like CMYK, or Pigment-Based color spaces. Basically, the darker your image is in your channel, the more opaque, or solid, your selection is going to be.
I almost always work in RGB, but I prefer to work with my channels behaving as if they were Pigment-Based. This may sound odd, but you don't have to work this way at all if you don't want to. People work best with Photoshop when they're comfortable with it.

Red + Green + Blue builds up light and creates an image we can see and understand.
The RGB channels in your document are made the same way as these selections. They are Grayscale representations, except that Photoshop combines them to create the RGB values in your image.
In the Red Channel, areas that have a lot of red are represented with more white light. We can see some Red in the Blue LED, giving it a purple tint. We also see pure white in the Red LED, presumably because it's Red. It's a similar story in the Green and Blue Channels, with the brightest light going down respectively where the light is Green or Blue.
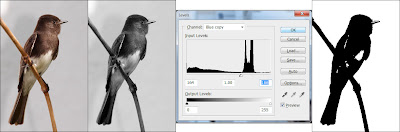
It can be helpful to keep in mind that Selections from the Marquees, Alpha Channels, and your Color Space Channels are the same kinds of thing. In this demo, I make a copy of my Blue Channel and radically adjust the Levels (Cmd + L), bringing Highlights up and Darks down, creating dramatic black and white contrast.
From there, I paint in the areas of speckle to get complete selection.
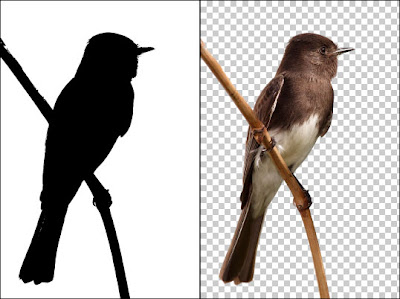
With this selection neatly painting in, I (Cmd + Click) my Alpha Channel, return to my Layers Pallette, and use "Layer via Cut" (Cmd + Shift+ J) and remove the bird from the background, neatly and in one painless step. This will oftentimes give you accurate cutouts that the Magic Eraser will not in a short space of time that you will not get with the regular Eraser tool.
The final word: As a Color Separator, I work extensively in Channels and I know the understanding you can get with experimenting with them. All images are essentially made of Channels, and Channels are glorified selections painted in a Grayscale Space. With this understanding and some zealous poking and prodding, you can get deep knowledge of Photoshop and do things you never thought possible.


