
Photoshop is a medium of Pixels, short for Picture Elements. Basically, when you fire up any version of Photoshop and open the pictures you want to edit, what you see and what the computer sees are not exactly the same thing. You see a picture of a Quarterback getting ready to snap a football; Photoshop sees thousands of dots lined up on a grid, each with individual properties.
Those dots are called Pixels. They make up one of the two kinds of computer images. This kind of image is called a Raster image, and Photoshop is called a Raster program because it deals largely with those images made from square dots. The other kind of image is a Vector image, and I'll talk about that another time.
Each of those dots have similar properties. When you open a picture, Photoshop reads a Location, Opacity, and Color for each of the thousands of pixels and renders them into something our eyes and brains can understand.
Let's go over these properties of pixels. Location is easy enough to understand. Photoshop puts everything on a 2D grid with X and Y coordinates. You don't have to refresh your algebra to understand it uses a grid of squares to keep track of where you want your pixels to go so it can put them there every single time. Once it knows where, it has to look at what Color and what Opacity each particular pixel is. Let's start with Opacity.
Past versions of Photoshop were the first image programs to introduce Layers, and as a consequence, Transparancy and Opacity. If the Opacity for some of your pixels is less than 100%, it is partly Transparent, and images below it in your layers will be affected by the transparent colors.
All layers in your Photoshop file have this same information: Color of dots, Location of dots, and Opacity of dots. It's important to keep these qualities in mind when you're working on your pictures because you can end up with a mess very quickly if you're working with a lot of layers. Opacity affects the color you see, not the color Photoshop sees. When Transparent colors overlap, they mix, showing you different colors. But if you still have the layers with transparent colors, the original color value is still there.
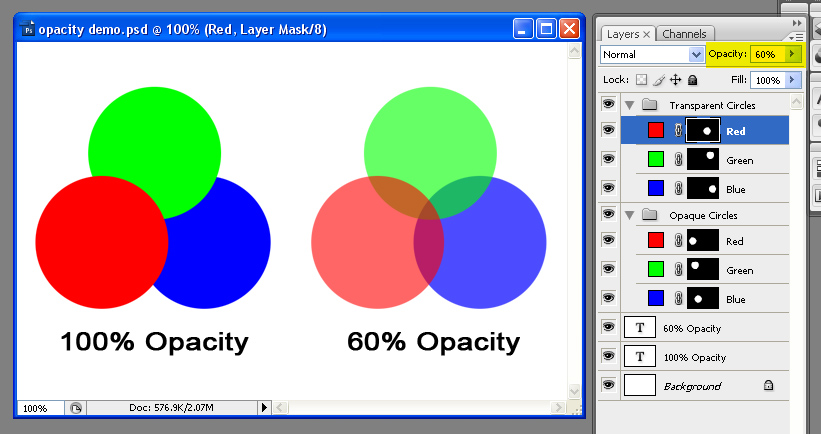
Notice how the colors blend, but the colors in my Layers Palette stay the same? That's how Opacity works throughout all of Photoshop, whether in the Layers Palette or with the Brush tool, or with other tools. You may see purple when red and blue blend transparently, but Photoshop sees two layers with lessened Opacity. The difference is that the colors remain separate entities, and can be returned to their original Opaque state.
Now on a more challenging topic--Color.
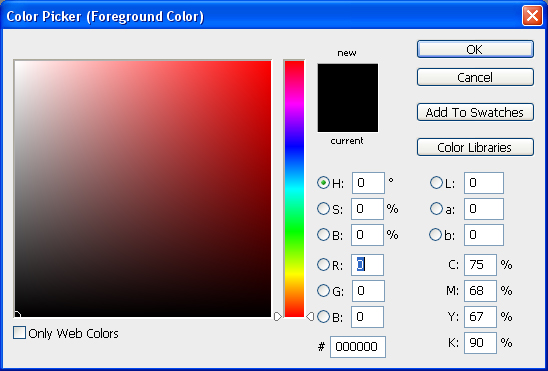
When you talk about color in Photoshop, you have to understand the computer doesn't know what "color" is. What it does "understand" pretty well is numbers. So, Photoshop keeps track of all the colors it has with numbers in different systems of Color Modes. These modes are RGB (for Red-Green-Blue), CMYK (for Cyan-Magenta-Yellow-blacK), Lab color(Lightness-a channel-b channel), and HSB (Hue-Saturation-Brightness). The two easiest to understand are RGB and CMYK, and they are also the most commonly used. For 99.9% of you, RGB will be the only thing you'll ever use or will need to use. I use Photoshop between six and ten hours a day and I rarely need anything outside of RGB for most of my purposes. Each has its own application, which I'll cover in another article, much later. For now, let's focus on RGB.
RGB is Photoshop's default color mode. Your monitor communicates to you through RGB because the so-called "primary colors" of light are Red, Green, and Blue. When these colors mix, you get pure white light, in Photoshop as well as in nature.

In this graphic, "Normal" represents Photoshop's Default Opaque layer effect. The "Screen" layer effect represents what that same color looks like as if it was light being cast--the brighter the color, the more opaque it appears. Red, Green, and Blue combine here to create white in the center. Red and Green combine to create Yellow, Blue and Red create Magenta, Green and Blue create Cyan.
These colors are represented by numbers in the corresponding channels, from zero to 255, a range of 256 options. Black has an RGB value of 0,0,0. White has an RGB value of 255, 255, 255. Any true gray is created by equal amounts of RGB, say 100, 100, 100. Pure red is 255, 0, 0. Likewise, pure Green is 0,255,0, and Blue is 0,0,255. Keep in mind we may not think of "Pure" Red, Green, and Blue looking like what Photoshop considers pure Red, Green, and Blue. But these are its primary colors, and as pure as you can get.
There are, of course, all manner of colors that are outside of the scope of this very narrow range of colors Photoshop can represent. This range of color is called a Gamut, which you can think of as a sort of box that contains the colors you can use--sort of like a box of crayons. But your monitor and printer can only represent a very limited number of the infinite subtlety of colors available in nature. But for our purposes, we have a palette of about 16.7 million colors to work with, with the rest of infinite spectrum of colors resting where we call Out of Gamut.
The final word:You do not need to understand all the subtleties of the various color modes to begin to use them, but dissecting RGB this way can begin to make Photoshop less overwhelming, and that is ultimately my goal for you. These principals, by the way, also apply to other Raster programs, like MS Paint, The GIMP, or CorelDraw. Until engineers come up with a better model for rendering colors, this is the standard we'll continue to work within. The important information to remember is that Raster Images are made of pixels, and pixels have three basic kinds of information attributed to them (Location, Opacity, and Color). Photoshop's default Color Mode is RGB, which I explained, but you don't need to have a deep grasp of--just understand it's basically limited colors tracked by numbers.
What's next? Learn about Resolution, or about File Types.
All graphics for this entry created by me are available under Creative Commons Share Alike License. All Licensed graphics available through the CC and GNU licenses they fall under.


This is very interesting to read such an amazing articles. Whole blog was really an awesome site which I have never found anywhere. Water Softener Shamong NJ All Safewater is a private owned water treatment company serving Burlington County Our goal is to make sure your water is safe for you and your family to drink and bath in. We understand the crunch of rising costs and do our best to provide affordable systems while providing top quality.
ReplyDeleteIts my predetermination to visit at this online journal and discover my required section alongside video demo, that is YouTube video and its additionally in quality.
ReplyDeletehttp://www.iranianimmigrationlawyers.com/